| What is DustBubble?How to Use?Product RangeContact Us |
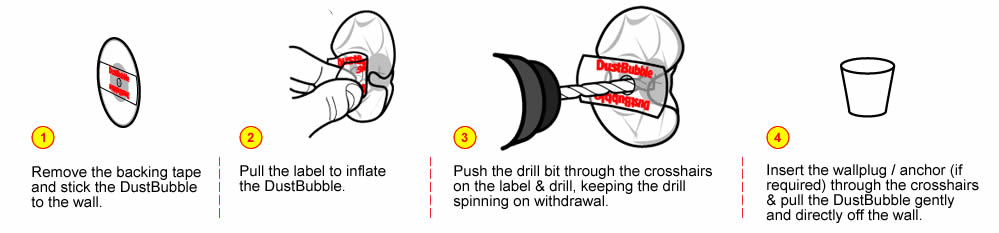 |
How to use Dustbubble? |
|
Asbestos, Lead-based Paint, Silica, Mold, MDF and Metal Swarf* Industrial DustBubbles combined with a wetting agent applied inside the enclosure ;captures all (when used correctly) the debris, there is no further equipment or decontamination necessary*. Transparent, Flexible & Bands Free All DustBubbles are transparent so you can always see where you are drilling. The flexible material allows drilling at an angle or in restrictive spaces and DustBubbles stick to the wall surface so they are hands free for safer drilling. Tough and Heat Resistant DIY DustBubbles are available for ‘Wallpaper & Painted Walls’, ‘Kitchen & Bathroom Tiles’ and ‘Wood (including MDF), Plaster (or Drywall) & Untreated Surfaces’. For non-contamination issue maintenance work these offer a hugely cost effective protection against dust for general health and safety protection and reduce or eliminate clean up time. The Glue The adhesive on a Dustbubble has a difficult job to do. Firstly it must stick the DustBubble to any wall and make an airtight seal. It must be strong enough to stick to untreated or greasy walls, wood or porous surfaces whilst it must also be gentle enough not to rip wallpaper or fresh paint. Just as tape manufacturers sell many hundreds of varieties of tape, then there will eventually be many varieties of DustBubbles. |
*Drilling with the Contamination Control DustBubble Kit is only recommended as part of an approved health and safety procedure and by an insured operator.Top Tips for Using DustBubblesOur DustBubbles for Wallpaper and Painted Walls a gentle adhesive to ensure the wall surface is not marked around the hole drilled. The DustBubbles for Wood, Plaster and Untreated Surfaces use a strong adhesive for porous or dusty surfaces. Care must be taken when using these especially when removing it from the wall as the strong adhesive can rip the bubble is handles carelessly. DustBubble for Kitchen and Bathroom Tiles has a thicker tissue based adhesive with non slip properties to help steady the drill bit, avoiding expensive accidents.
The first top tip is to always use the appropriate DustBubble for the wall surface and if possible test in a discreet place first. |
| What is DustBubble?How to Use? Product RangeContact Us |
| © 2024 Raycall Pty Ltd | a project by Oz Web Design Sydney |